Wednesday 30 May 2018

Invalid Export Business Process Not Activated

CRM solution not exporting and showing below error.


We were having three BPF in our solution.
Here are the steps we tried:

  1. I tried activating and deactivating all BPF and tried exporting but facing same error.
  2. Next, I tried removing all BPF (mentioned above) from the solution and added them back it works fine.
Hope it helps :).

Tuesday 13 June 2017

How to Use Common Login Control for Dynamics CRM?

Microsoft Dynamics CRM SDK provides a template for visual studio that allows to use the common login control to connect Dynamics CRM (Online, On-premises) with custom WPF application. This this common login control enables Microsoft Dynamics CRM authentication, its storage, and error logging. The only thing we need to do is to add login template to our WPF application in order to leverage the benefit of common login control in our custom application. This control resembles as shown in below screenshot;

Below are the steps to install visual studio extension for common login control;
  1. Locate and open the CRMSDK\SDK\Templates folder.
  2. Double click on “CRMSDKTemplates.vsix” this will install CRMSDK templates in your visual studio.
Control Implementation:
Steps given below:
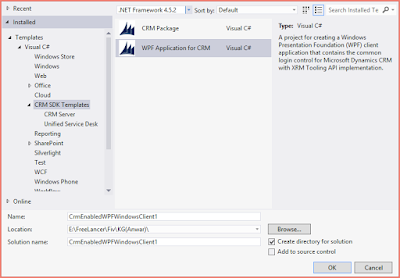
  1. Start Microsoft Visual Studio, and create a new project and select CRM SDK Template in Visual C# section. Select WPF application for CRM in it as shown below.
    Note:
    Ensure that .NET Framework 4.5.2 is selected.

  2. Go to “CRMLogin.Xaml” file present in Login Window folder in your project, as shown below;


You don’t need to code for CRM login, it will be automatically handled by the login control.
You can set your own application logic, after authentication to CRM.
For a sample that uses the common login control template to connect to Dynamics 365 and perform various operations, follow below steps:
  1. Locate and open the CRMSDK\SDK\SampleCode\CS\XRMTooling folder.
  2. Open the QuickStartXRMToolingWPFClient.sln file in Visual Studio.

Wednesday 1 June 2016

How to hide POSTS/ACTIVITIES/NOTES tabs from Social Pane CRM

Microsoft introduce "Social Pane" feature in Dynamic CRM 2013, where from user can create and see social posts.

Sometime we need to hide them as per business requirement.

Example: Let say our client business requirement is to hide "SYSTEM POSTS" and "NOTES" from Contact entity form.

Solution: Copy the below javascript and save it in a notepad file. Save the file with the extension(.js).

function HideSocialPaneItems() {
    var tabs = ["SYSTEM POSTS", "NOTES"];
    for (var tabsid = 0; tabsid < tabs.length; tabsid++) {
        HideTabs(tabs[tabsid]);
    }
}

function HideTabs(socialPaneType) {
    var ctrlElement = document.getElementById("header_notescontrol");
    if (ctrlElement.children != null && ctrlElement.children.length > 0) {
        for (var ele = 0; ele < ctrlElement.children.length; ele++) {
            var ctrl = ctrlElement.children[ele];
            if (ctrl.title == socialPaneType) {
                ctrl.style.display = "none";
                if (ele + 1 < ctrlElement.children.length) { ctrlElement.children[ele + 1].click(); return; } else if (ele - 1 >= 0) {
                    ctrlElement.children[ele - 1].click();
                    return;
                }
            }
        }
    }
}

Now create a javascript web resource in the CRM and call it whatever you like, browse to and select the .js file you just created.Next we need to add this web resource to the contact form, where you want to hide the Social Pane Tabs.
Open the form editor and select “Form Properties” from the top toolbar. On the “Events” tab under Form Libraries click “Add” and find the web resource you just created.
In the “Event Handlers” section select “OnLoad” from the drop down list. Click “Add” and select the library you just created.
In the “function” box you must enter the name you gave the function in the script which in this case is “HideSocialPaneItems” as you can see on line 1 of the script.


Solution: In the result view both tabs not displaying.

Note : It's compatible with Dynamic CRM 2013 and 2015 as well without update 1.
 "Use legacy form rendering" for CRM 2015 update 1 and also for CRM 2016 update 1.
Under Settings -> System Settings -> General tab, select Yes 


Wednesday 11 May 2016

How to hide or show Subgrid depending on field value in Dynamic CRM 2016?

Here is the step by step guide about "How to hide a Subgrid in Dynamic CRM".
I found the discussion regarding the same issue in the Forum. So I started following up to come out with a definite answer.
As Microsoft Dynamics CRM 2016 provides several new capabilities and methods to working with sub grids.
As an example let say we need to hide or show the Contact section from the Account form based on the condition of Depending Field see in the picture below.


First of all we need to find the schema name of the sub grid.
You can do this by opening the form editor and then double clicking on the specific sub-grid.

To hide the sub-grid, you want to make sure to use supported JavaScript.
I would like to hide a subgrid depending on what value a Depending Field is showing.
Copy the below javascript and save it in a notepad file. Save the file with the extension(.js).

function HideSubgrid() {
        var dependingfield = Xrm.Page.getAttribute('dependingfield').getValue();
        if(dependingfield == 1)
       {
               Xrm.Page.ui.controls.get('Contacts').setVisible(true);
       }
       else
       {     
              Xrm.Page.ui.controls.get('Contacts').setVisible(false);
        }
}

Create the web resource and call it whatever you like, browse to and select the .js file you just created.


Next we need to add this web resource to the form you want to hide the Subgrid. Open the form editor and select “Form Properties” from the top toolbar.
On the “Events” tab under Form Libraries click “Add” and find the web resource you just created. In the “Event Handlers” section select “OnLoad” from the drop down list. Click “Add” and select the library you just created, in my example it’s called new_hidesubgrid. In the “function” box you must enter the name you gave the function in the script which in this case is “HideSubgrid” as you can see on line 1 of the script.


Click OK, save and publish all your changes and you will see sub grid based will hide or show on base of condition.