Microsoft Dynamics CRM SDK provides a template for visual studio that allows to use the common login control to connect Dynamics CRM (Online, On-premises) with custom WPF application. This this common login control enables Microsoft Dynamics CRM authentication, its storage, and error logging. The only thing we need to do is to add login template to our WPF application in order to leverage the benefit of common login control in our custom application. This control resembles as shown in below screenshot;

Below are the steps to install visual studio extension for common login control;
- Locate and open the CRMSDK\SDK\Templates folder.
- Double click on “CRMSDKTemplates.vsix” this will install CRMSDK templates in your visual studio.
Control Implementation:
Steps given below:
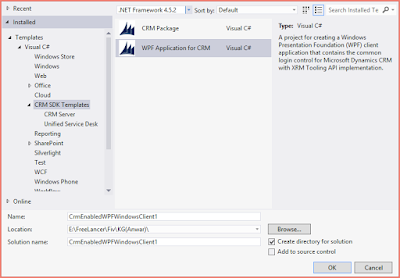
- Start Microsoft Visual Studio, and create a new project and select CRM SDK Template in Visual C# section. Select WPF application for CRM in it as shown below.
Note: Ensure that .NET Framework 4.5.2 is selected.
- Go to “CRMLogin.Xaml” file present in Login Window folder in your project, as shown below;


You don’t need to code for CRM login, it will be automatically handled by the login control.
You can set your own application logic, after authentication to CRM.
For a sample that uses the common login control template to connect to Dynamics 365 and perform various operations, follow below steps:
- Locate and open the CRMSDK\SDK\SampleCode\CS\XRMTooling folder.
- Open the QuickStartXRMToolingWPFClient.sln file in Visual Studio.